Strawberry Walnut Crunch

image

I have a small family… Just the three of us. So it isn’t cost effective for us to have a Costco membership… All the food ends up going to waste. Often recipes are too large for the three of us, which is why I look forward to having family over to eat with us. I get to make large quantities lots of food and it doesn’t go to waste. Or there are some dishes that are my favorite but the work that is required for three people outweighs the “Yummy in my tummy” feeling I would get once I was able to sit down to eat.

Aside from spending time in the kitchen, I love spending time in the living room watching Food Network. While watching the Pioneer Woman she made these delicious appearing Strawberry Oat Bars. But the quantities would be far too much for the three of us, so the recipe below is halved… Also I added walnuts because I wanted to make sure it had a crunchy texture.

Recipe adapted from Pioneer Woman

1 stick butter plus 6 tbsp., cut into pieces
3/4 cup flour
3/4 cups oats
1/2 cups brown sugar
1/2 tsp baking soda
1/4 tsp salt
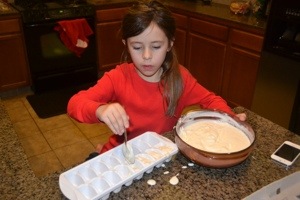
4 oz. strawberry preserves (My daughter went a little crazy with the preserves and it still turned out great!)
1/2 cup chopped walnuts

1. Preheat oven to 350 degrees. Spray your baking dish with non stick spray.

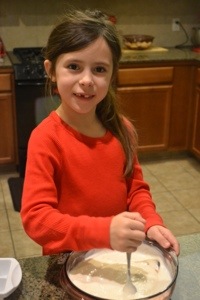
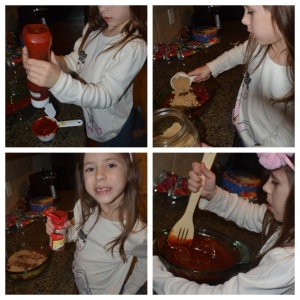
2. In a large bowl add the the butter, flour, oats, brown sugar, baking soda, and salt. I gave my daughter the 1/4 measuring cup and put those math skills to the test.

image

3. Then have your little chef use a pastry cutter, mix all the ingredients so that it now resembles a crumble. Mixed in the chopped walnuts with a spoon or fork.

image

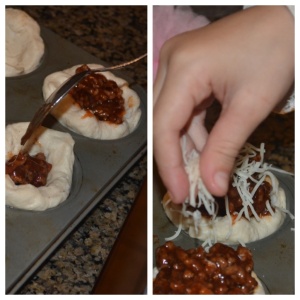
4. Put half of the mixture into the bottom of your baking dish and press with the backside of the spoon. Now spoon and spread the preserves across the bottom layer. Put the remaining crumble mix on the top and gently press down.

image

5. Put it in the oven for 35-40 minutes.

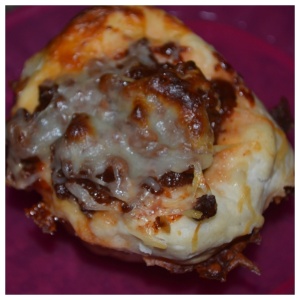
6. Enjoy! This is intended for breakfast but my husband and daughter could not wait until the morning and dug in after dinner.

image

Mine may look different then what you make because I used Earth Balance which is a dairy free butter.

Raisin Persimmon Cookies

Holy Moly! Holidays are done and boy were we busy. A house full a family, lots of cooking and baking, but I would not have it any other way. My daughter and I were able to spend lots of quality time in the kitchen but since I was basically running an assembly line for treats, there were very few pictures.

I mentioned before that we give baked goods for gifts at the holidays and this year we tried something new. Persimmon cookies! I made the most unbelievable mistake a few years ago when trying persimmons… I tried it raw. Yuck, Yuck, Yuck! Recently a co-worker brought them to work, from their tree, and told me I should try making them with my daughter. I began quizzing them about persimmons and told them about my horrid experience. The secret is baking soda! After the persimmons have been pulped put some baking soda in and mix that up let it sit for several minutes, the baking soda will neutralize the acidity in the persimmon pulp.

Excellence ensued once I got this recipe into my kitchen. And what type of work did I have my daughter do while I was running around like a crazy person? I had her pulp the persimmons! She is a country girl at heart who loves to get dirty, so giving her persimmons to pulp was right up her alley. She just squeezed until the inside till it plopped out, she wanted to be thorough so she also scooped any remaining pulp out. Below is the recipe we used which was really a combination of several recipes that I received from my co-workers and a picture of my daughter “pulping” the persimmons.

20130102-194021.jpg

1 1/4 cup persimmon pulp
2 tsp baking soda
1 cup sugar
1/2 cup brown sugar
1 stick, unsalted butter (room temp)
Pinch of salt
1/2 tsp nutmeg
1/2 tsp cinnamon
1 tsp baking powder
1 slightly beaten egg
1 tsp vanilla
2 cups flour
1/2 cup raisins (California… Of course!)
1/4 cup finely chopped walnuts

1. Mix the persimmon pulp with the baking soda, and let that sit for about 10 minutes before incorporating into the rest of the batter. Preheat the oven to 350 degrees.

2. Beat together the butter and sugars. Once they are well combined add in the salt, nutmeg, cinnamon, baking powder, egg, and vanilla.

3. Slowly beat in the flour… Adding a little at a time until each addition is fully incorporated.

4. Fold in the raisins and walnuts in until evenly mixed in. You can add more raisins and walnuts, which is what most of the recipes I received suggested, but my husband perfers his cookies not to be too crunchy.

5. Portion onto a lined cookie sheet and cook for 12 minutes. These cookies are very moist.

6. Enjoy!

I hope everyone had an amazing holiday and wish you all a very Happy New Year! I am focusing on making time for myself and my family. I will be competing in my first half marathon at Disneyland in a few days. I say competing very loosely as my goal is just to finish, I am not much of an athlete. So here is to a New Year and a new me!

Pancake cupcakes

imageToday is a day we have been looking forward to for a while… The Hobbit came out last week And we were able to see it today. We are lovers of all thing associated with geeks, nerds, dorks, and any other word that would be found next to those in a thesaurus. There was a time when I would of been ashamed to declare my love for Harry Potter, Star Wars, Lord of the Rings, etc. But now I fly my geek flag high. My daughter dresses up when these types of films come out, it has been something I look forward to planning for and she looks forward to dressing up.

I would be a bad fan if I hadn’t been thoroughly anticipating December 14th for several months. While doing a marathon of the initial three films I realized what the perfect meal to make for this movie was… Breakfast, but not just any breakfast… Second breakfast. So we made pancake cupcakes!!!! Unlike those in the shire we would be unable to consume two full meals. So a bite size meal was fitting.

Recipe
2 cups boxed pancake mix
1 1/2 cups milk
Bacon bits

Frosting
2 sticks butter, room temperature
2 tbsp maple syrup
3 cups powder sugar

1. Pre-heat the oven to 350 degrees.
2. Combine boxed pancake mix and milk, whisk thoroughly, it will be THICK.
3. Portion off into greased cupcake liners. I filled slightly less then half way full, as these will rise considerably during baking.
4. Pop in oven for 15 minutes.
5. Allow to cool.
6. Beat butter until fluffy. Add in maple syrup and powder sugar.
7. Frost cupcakes and sprinkle with bacon.
8. Enjoy!

This is something we serve for Christmas Breakfast and guys/men/boys go insane for them. I make them the night before, make the frosting, and it is ready in the morning.

Doggy Treats

We love giving home baked goods as gifts for Christmas! We have been busy at work making everthing from candy to beef jerky. It is a busy time of year, but we couldn’t forget about our dogs! They are part of the family, we call them the puppy sisters, and between the two of them and my daughter they fight and tell on each other like sisters do. Making dog treats is enjoyable but it is much harder to incorporate my daughter in that process, so when I seen a recipe for homemade Frosty Paws I ran to the store to get the ingredients that I needed.

They have been a hit, and we have given them out to our extended family’s animals as well. Nothing has brought my daughter more joy than making this and “treating” her sisters to this chilly snack.

Recipe
32 oz. plain yogurt
1 mashed ripe banana
2 tablespoon peanut butter
2 tablespoons honey
Ice tray, these sizes are much better for our little dogs then the large bowl available at our Target

1. I started by measuring the honey and peanut butter slightly, so that it would be easier to stir for my daughter. I threw in all the rest of the ingredients in and let her stir till her heart was content.

20121218-205123.jpg

2. Then she spooned it into the ice tray. I popped the tray in the freezer until it was ready to treat them.

20121218-205333.jpg
That’s the only mess she made! I’ll have to remind her next time she gets sloppy.

3. Let them enjoy! I thought wrangling kids for pictures was difficult, but two dogs and one kid was a killer. So I couldn’t get a good picture.

Happy Holidays!

BBQ Biscuits

This is a family favorite! My husband will ask for something this simple for his birthday. I would never complain about that not only do they enjoy being able to eat it but my daughter loves helping me cook it!

1 lb. ground beef
1 can buttermilk biscuits
1 cup cheese, I use whatever is in the fridge, shhhh!
1 1/2 ketchup
4 tbsp BBQ sauce (Sweet Baby Rays for the win)
1 tbsp chili powder
1/2 cup brown sugar

1. Preheat oven based on what your biscuit container says.

2. Cook your ground beef all the way through. While I am doing that I have my daughter roll out the biscuits. And putting them into greased muffin tins.

image

3. I have my daughter make the BBQ sauce by measuring and whisking together the ketchup, BBQ sauce, chili powder, and brown sugar. Pour this over the cooked ground beef until the meat is evenly coated.

image

4. I have my daughter spoon the meat into the “biscuit cups”. Once all of them are filled, they will be over flowing, sprinkle them with cheese.

image

5. Pop in the oven for whatever the suggested cooking time is for the biscuit, for mine it was 15 minutes.

6. Enjoy!

image

We have tons of variations on this, that I will share in the future, but this is a great weeknight meal! After a long day of work for me to just brown ground beef and pawn the rest of the work off on my all too excited daughter, I am a happy Momma!

Sweet Potato/Potato Salad

20121202-192611.jpg

Being a mom is exhausting. So when I plan family vacations I try to stay away from theme parks, I always fell those vacations are more tiring than working and coming home. For the past couple of years we have been picking different cities, going to explore them, and see what things they have to offer that we do not get to do when we are home. This year we went to Portland and while there we visited The Blue Heron French Cheese Factory. Yes, my husband and daughter have quiet the sense of humor, to take someone with a milk allergy to a cheese factory and go cheese tasting.

While we were they I tried this heavenly potato salad, I had never had anything like it. It was delicious! My daughter requested it be served at her birthday party, and the guests were very impressed.

5 Russet Potatoes, large (peeled and chopped)
3 Sweet Potatoes, large (peeled and chopped)
2 Hard Boiled Eggs, chopped
1 Cup Mayonnaise
1/4 Cup Milk (I used rice milk)
2 stalks celery diced
1-2 tbsp dill, chopped
1 tsp salt
2 tbsp sugar

1. Boil the russet potatoes and one sweet potato. In a separate pan boil the remaining two sweet potatoes. The reason for the separation is you want one to be soft enough to mash and the others to be fork tender. Once both batches are fork tender strain water out.
2. Mash up the sweet potato that was boiled with the russet potatoes. Now add in the mayonnaise, milk, dill, salt, and sugar. Mix together until fully incorporated and add the celery in.
3. Combine potatoes (russet and sweet) and chopped hard boiled eggs in a large bowl. Gently fold in “the dressing” that was made, folding until the potatoes are coated. Some of the sweet potatoes may be come mush thats okay, it adds to the character.
4. Refrigerate for at least three hours or overnight.
5. Enjoy!

If you are a lover of eggs you can add more, I am not, and it will be just as good.

Cream Cheese Frosting

20121202-183248.jpgCream cheese frosting is was my favorite! Most cream cheese frostings are very thick, making it difficult to work with in the kitchen. My solution has been to slap it on top add more butter. Not only did it get become more manageable, but for me the taste was exponentially more delicious. Below is my recipe for cream cheese frosting.

8 oz. cream cheese, room temp (I use Neufchâtel because it has less fat, and I can’t tell the difference

2 blocks in salted butter, room temp

1 tsp. vanilla

Pinch of salt

4 1/2 cups powdered sugar

1. Beat together the cream cheese and butter. Because of the thickness of the cream cheese I scrap the bowl a couple of times, to make sure everything gets mixed in and isn’t sticking to the sides of the bowl. Nothing is worse than frosting that isn’t thoroughly mixed.

2. Once it is well incorporated add the vanilla and the pinch of salt.

3. Slowly add in the powdered sugar, each time making sure what you added is fully incorporated. Trust me you do not want powdered sugar flying everywhere when you begin to beat the frosting.

4. You are ready to frost cakes, cupcakes, or use this as a delicious filling.

A Very Merry Un- Birthday

20121202-191802.jpg

I mentioned that Wednesday was my daughter’s birthday, but today was her birthday party! Beyonce talks about becoming Sasha Fierce when she steps onto stage, when it comes to party planning I become a different person entirely… The past few days have been a blur of making decorations, setting up, cleaning, cooking, and baking. Thank goodness for that alter ego of mine because she took over the wheel!

I mentioned that in my family nerdiness is valued. Along with that comes the need to pay attention to detail. When my daughter said she wanted an Alice and Wonderland party I knew I needed to do it justice it deserved, as it is a story near and dear to my heart.

I made Red Velvet Cupcakes with Cream Cheese Frosting a la the Red Queen. To save time I used the box cake mix and made the frosting myself. I will share this recipe later this week.
20121202-183248.jpg

I also made Strawberry Chesire Cat Cupcakes! I also made these from the box, but added 3 tbsp. strawberry puree. The guest thought they were homemade, and who am I to tell them any different? 😉 I doubled this recipe to make the frosting
20121202-183932.jpg

Since it was a birthday party and we were celebrating everyone’s un birthday as well we went a bit crazy on birthday cake desserts.

We did birthday funfetti dip,
20121202-184856.jpg
Click here for the recipe

Birthday cake rice crispy treats,
20121202-202753.jpg
Click here for the recipe

And chocolate chip cookie dip. It pains me how delicious this is, and I am unable to gobble it down!
20121202-185059.jpg
Click here for the recipe

Also we had sweet potato/potato salad. It was fantastic I made this recipe up after having something similar on our family vacation! I will share later this week! It was so good my husband said to save it for ourselves. My inner party planner butted in and told him, “Nopers!”
20121202-191739.jpg

Because my alter ego, who is a perfectionist, took over this weekend there was little help required of my daughter in the kitchen. She helped with some of the decorations: the mushrooms, the flowers with eyes, painting the cards and characters, the mome raths, and the cylindrical paper lanterns. But as a do it all mom I wanted to share these with you!20121202-190454.jpg

All in all it was a great day! And I am giving my alter ego time off till Christmas at which point she will return with vengeance.

Thanks for reading this blog from Tweedle Dee and Alice!

20121202-200534.jpg

Sweet and Sour Chicken

Today is a special day in my house, my daughter turns six! In all honesty I pretend that she has Peter Pan-itis and will never grow up, we live in Neverland, and all you need is faith, trust, and pixie dust Like I do for everyone else’s birthday, I asked what she wanted to do for her birthday dinner. Since she is six I was assuming she would want to go to Red Robin or a similar establishment. Boy was I wrong, she wanted sour chicken… Aka sweet and sour chicken. When I told her that I wouldn’t be able to make that because of the time it takes to fry the chicken. (She is a hungry girl and I wouldn’t be able to fend her off while it cooks) She then said Panda Express, it was clear to me that she wasn’t going away from the Chinese food theme meal. So we negotiated, (she has a future in negotiations) we compromised… I would make it the Sunday before her birthday and we would go to a restaurant where they sing to you the day of her birthday.

The thought of frying chicken may be scary to some home cooks, it was for me. But the sauce recipe can easily be poured over breaded chicken from the freezer section. For my family it’s not an option because of my allergy curse, but in the good ole’ days it was do-able and just as fantastic.

You may already be asking yourselves… Isn’t this a blog about getting your kids in the kitchen? Yes! Did you say homemade fried chicken? Yes! Part of getting your kids into the kitchen is finding jobs within the kitchen that fit your child’s ability. With meals like this I put my daughter on “sauce duty”! Which entails her measuring out the ingredients for the sauce and stirring it. It has been a great way to introduce her to measuring, and for her to practice her math skills. That is right, I trick her into practicing math, she will thank me when she is older.

Recipe
3/4 cup sugar
1/2 cup vinegar
4-5 tbsp ketchup
1 tbsp soy sauce
1 tsp garlic salt

1. Preheat the oven to 350 degrees, or what the freezer package says if your are not frying the chicken breast.

2. Help your chef in training measure out the ingredients. Unfortunately for me, my child is not coordinated enough to get the ingredients into the tbsp. or tsp. so we eyeball it. Have your child whisk the ingredients together, if your kids is anything like mine they will love the whisk!

3. If you are not frying your own chicken, skip this step. Begin heating Canola oil on high. For our chicken we cube three breast into 1 inch pieces. Set up two pans one with 1 cup cornstarch, 1 tsp. salt, 1 tsp. pepper, and 1/2 tsp. ginger in the other pan three lightly blended eggs. Coat the cubed chicken in cornstarch mixture, egg, and fry until it is golden brown on each side. Remove from oil until all chicken is done. (NOTE: I Do Not let my daughter fry or touch the chicken. I usually do this step myself but she wanted to drop the cornstarch mixture over a couple pieces)

4. Spray 9×13 pan with non-stick cooking spray, put all chicken into the pan. Pour the wonderful sauce made by your little chef over the chicken. Mix to coat chicken with sauce.

5. Cook for 15 minutes, turn chicken to coat with sauce Return to oven for 15 more minutes. After 15 remove from oven, turn to coat, allow to cool 5-10 minutes.

6. Enjoy! I know my birthday girl did. I caught her sneaking out of her bed to get more. How many dinner meals can you say that about.

Squid Hot Dogs

I have a picky eater, I hate to admit it, but I do. My daughter would be perfectly content with eating hot dogs, chicken nuggets, PB&J, and Panda Express for the rest of her life. But I enjoy trying new foods whether we are at a restaurant or at home. I seen this idea on Pinterest, and thought this would be a great way to get her out of this rut. She calls them Squid Hot Dogs, weird names help kids eat anything. They are the easiest thing to make and they make her happy, which makes me happy.

1. I let her cut the hot dogs herself, using a butter knife, it’s great practice for cordination and she won’t lose any digits this way.

2. “String” the hot dogs with spaghetti noodles that are uncooked, continue until all the hot dogs are done.

3. Put the “squids” into a pot of water. I wait to boil mine until she is all done, because she likes to drop them into the water. Begin to boil. Cook until spaghetti noodles are cooked all the way through. Drain the from the water, or “fish” those little squids out with a fork.

4. Enjoy!

This was the first experiment with something different and the dish that got me started down the path of getting her involved in the kitchen. It has worked wonders and it helps that her dad acts like he is freaked out by them. It led to her loving spaghetti and ball park pasta.

*Disclaimer* each child’s ability in kitchen varies, and I highly recommend you oversee your child while doing the cutting if they have never used a butter knife.